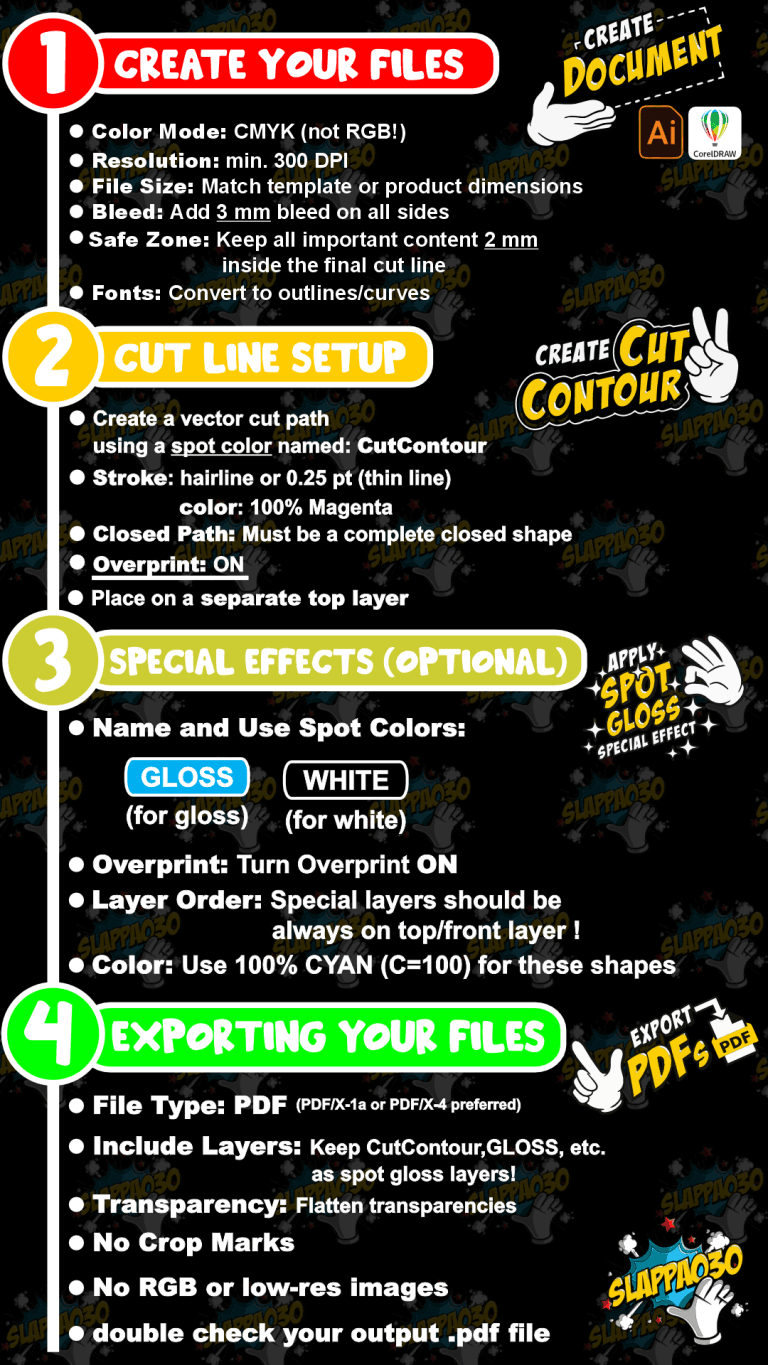

Unsere Datei- und Druckanforderungen:

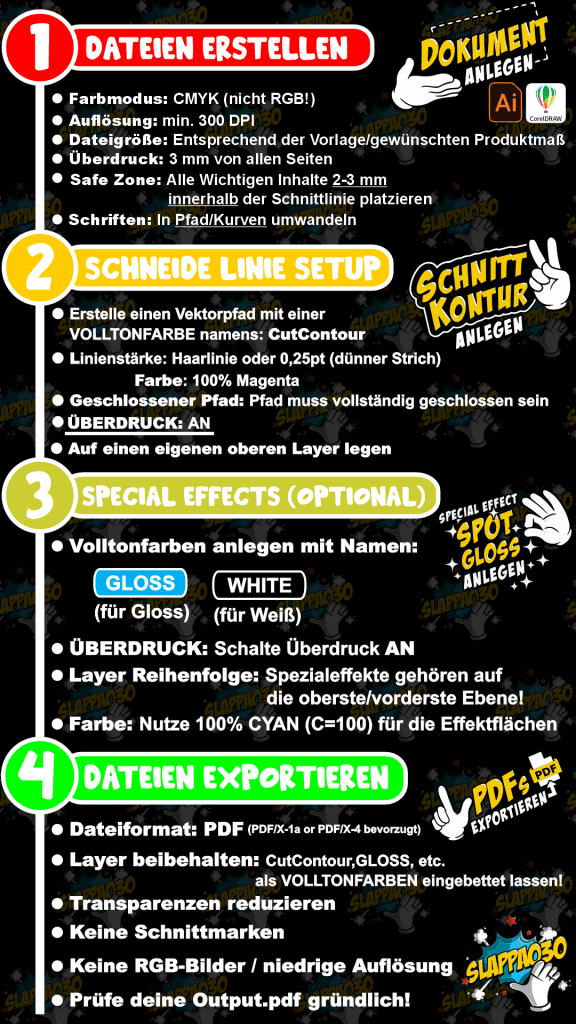

1. Richten Sie Ihr Dokument richtig ein
– File > New
– Primary Color Mode: CMYK
– Resolution: 300 dpi
– Document size with 3 mm bleed on each side
– Example: 50×50 mm sticker -> page size: 56×56 mm
– Alternative: Tools > Options > Document > Bleed
– Use ISO Coated v2 300% color profile
2. Entwerfen Sie Ihren Entwurf
– Design text, logos, images
– Maintain 3 mm safety margin
– Convert text to curves: Ctrl + Q or right-click > Convert to Curves
– Ensure images are 300 dpi
3. Ebenen für Spezialeffekte hinzufügen
– Open Object Manager (Window > Objects) > Add New Layer
– Name: WHITE, GLOSS, HOLO
– Copy design to same position on new layer
– Fill: 100% K (black)
– Palette Editor: Add Color > CMYK > Name (e.g. GLOSS) > Spot Color
– Assign Spot Color, enable Overprint Fill / Outline (Object menu)
– Check via View > Simulate Overprint
4. Fügen Sie die CutContour
– Top layer: CutContour
– Draw closed vector path
– Stroke only (no fill)
– Color: 100% Magenta
– Create Spot Color named CutContour
– Stroke: 0.2 pt or Hairline
– Enable Overprint Outline
5. Als PDF exportieren
– File > Publish to PDF
– PDF/X-1a or PDF/X-4
– Settings: no trim marks, include 3 mm bleed
– Preserve Overprints, do not convert spot colors
– Convert all text to curves
1. Erstellen Sie das Dokument
– File > New
– Preset: Print (CMYK)
– Set size and 3 mm bleed
– Advanced: Raster Effects: High (300 ppi)
2. Erstellen Sie Ihren Entwurf
– Create artwork
– Convert text: Type > Create Outlines or Shift + Ctrl + O
– Check images: 300 dpi
– Keep content 3 mm inside trim
3. Erstellen von Schmuckfarbebenen
– Layers panel: new top layer (e.g. GLOSS, WHITE)
– Copy design to new layer
– Fill: 100% K
– Swatches panel: New Swatch > Name > Spot Color > CMYK
– Assign swatch, open Window > Attributes > check Overprint
– Check in Separations Preview
4. Fügen Sie die CutContour
– Top layer: CutContour
– Draw closed vector path (Pen or Shape Tool)
– Stroke only, no fill
– Create Spot Color: Name = CutContour, Color = 100% Magenta
– Stroke width: 0.25 pt
– Enable Overprint Stroke (Attributes)
5. Exportieren Sie Ihr PDF
– File > Save As > Adobe PDF
– Preset: PDF/X-4:2010 or PDF/X-1a
– Marks and Bleeds: No marks, use document bleed
– Output: No color conversion, preserve spot colors
– Advanced: High Resolution (if PDF/X-1a), create layers if needed